DCP Client
The client of our data centric platform for microscopy imaging.
Installation
For installing dcp-client you will first need to clone the repo:
git clone https://github.com/HelmholtzAI-Consultants-Munich/data-centric-platform.git
Then navigate to the client directory:
cd data-centric-platform/src/client
In your dedicated environment run:
pip install -e .
This installation has been thoroughly tested using a conda environment with python version 3.9, 3.10, 3.11 and 3.12 on a macOS local machine.
Running the client: A step-by-step guide!
1. Launching the client
DCP includes a client and server side for using our data centric platform. The client and server communicate via the bentoml library. There are currently two options available: running the server locally, or connecting to the running instance on the FZJ jusuf-cloud.
Before continuing, you need to make sure that DCP server is running, either locally or on the cloud. See DCP Client for instructions on how to launch the server. Note: In order for this connection to succeed, you will need to have contacted the team developing DCP, so they can add your IP to the list of accepted requests.
At this step you will also need to specify whether your data has a single class (simple instance segmentation task), or multiple (multi-class instance segmentation task). If you are dealing with multiple classes in your data which you need to annotate, then you need to include the arguments --multi-class and --num-classes N in your run command (see below).
After you are certain the server is running, simply run:
dcp-client --mode local --multi-class --num-classes 3or
dcp-client --mode remote
Set the --mode argument to local or remote depending on which setup you have chosen for the server. In the first example, we are running the server locally and have a multi-class problem with three classes in the data. In the second example, the server is running remotely and the task at hand is a pure instance segmentation problem (--num-classes doesn’t need to be specified, defaults to 1).
2. Welcome window
The welcome window should have now popped up.
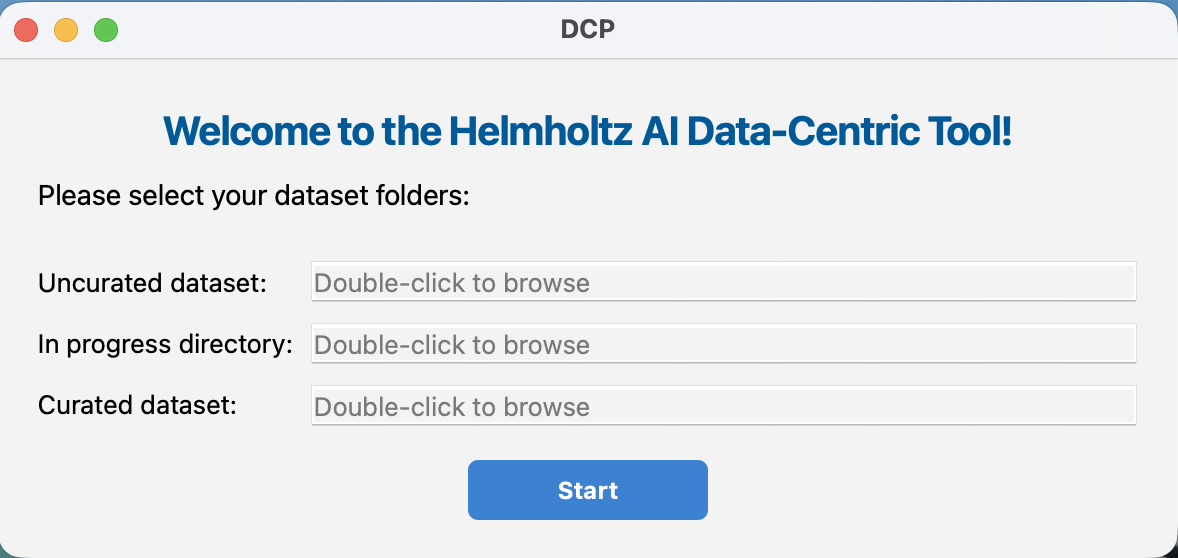
Here you will need to select the directories which we will be using throughout the data centric workflow. The following directories need to be defined:
Uncurated Dataset Path:
This folder is intended to store all images of your dataset. These images may be accompanied by corresponding segmentations. If present, segmentation files should share the same filename as their associated image, appended with a suffix as specified in
server/dcp_server/config.cfgfile (default: ‘_seg’).
Curation in Progress Path (Optional):
Images for which the segmentation is a work in progress should be moved here. Each image in this folder can have one or multiple segmentations corresponding to it (by changing the filename of the segmentation in the napari layer list after editing it, see Viewer). If you do not want to use an intermediate working dir, you can skip setting a path to this directory (it is not required). No future functions affect this directory, it is only used to move to and from the uncurated and curated directories.
Curated Dataset Path:
This folder is intended to contain images along with their final segmentations. Only move images here when the segmentation is complete and finalised, you won’t be able to change them after they have been moved here. These can then used for training a ML model, or other downstream tasks.
After setting the paths for these three folders, you can click the Start button. If you have set the server configuration to the cloud, you will receive a message notifying you that your data will be uploaded to the cloud. Click Ok to continue.
3. Data Overview
The main working window will appear next. This gives you an overview of the directories selected in the previous step. The following options are available: - You can double click on an image to view it or select it and then hit ‘Enter’ to launch the viewer. This will launch the viewer (see next step) - Generate Labels: button will run the segmentation model to generate labels for all images in the “Uncurated dataset” directory (this will call the
segment_imageservice from the server). The resulting masks will have the same naming as their corresponding image, followed by ‘_seg’ in your data directory. - Extract features: button will extract selected features for all data found in the “Curated dataset” and save them to an excel spreadsheet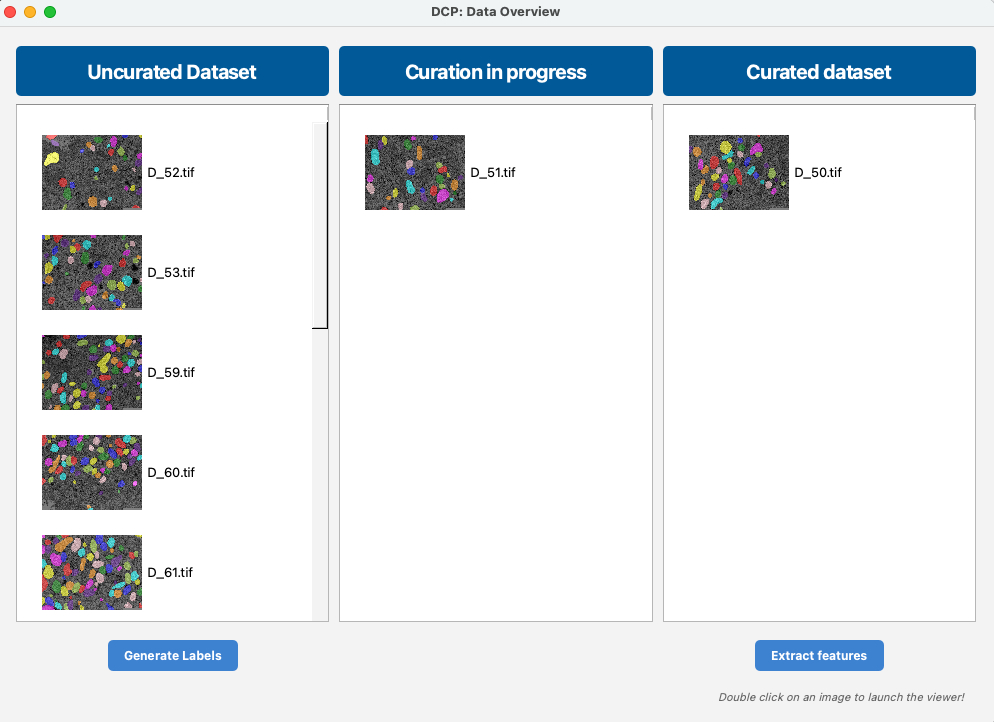
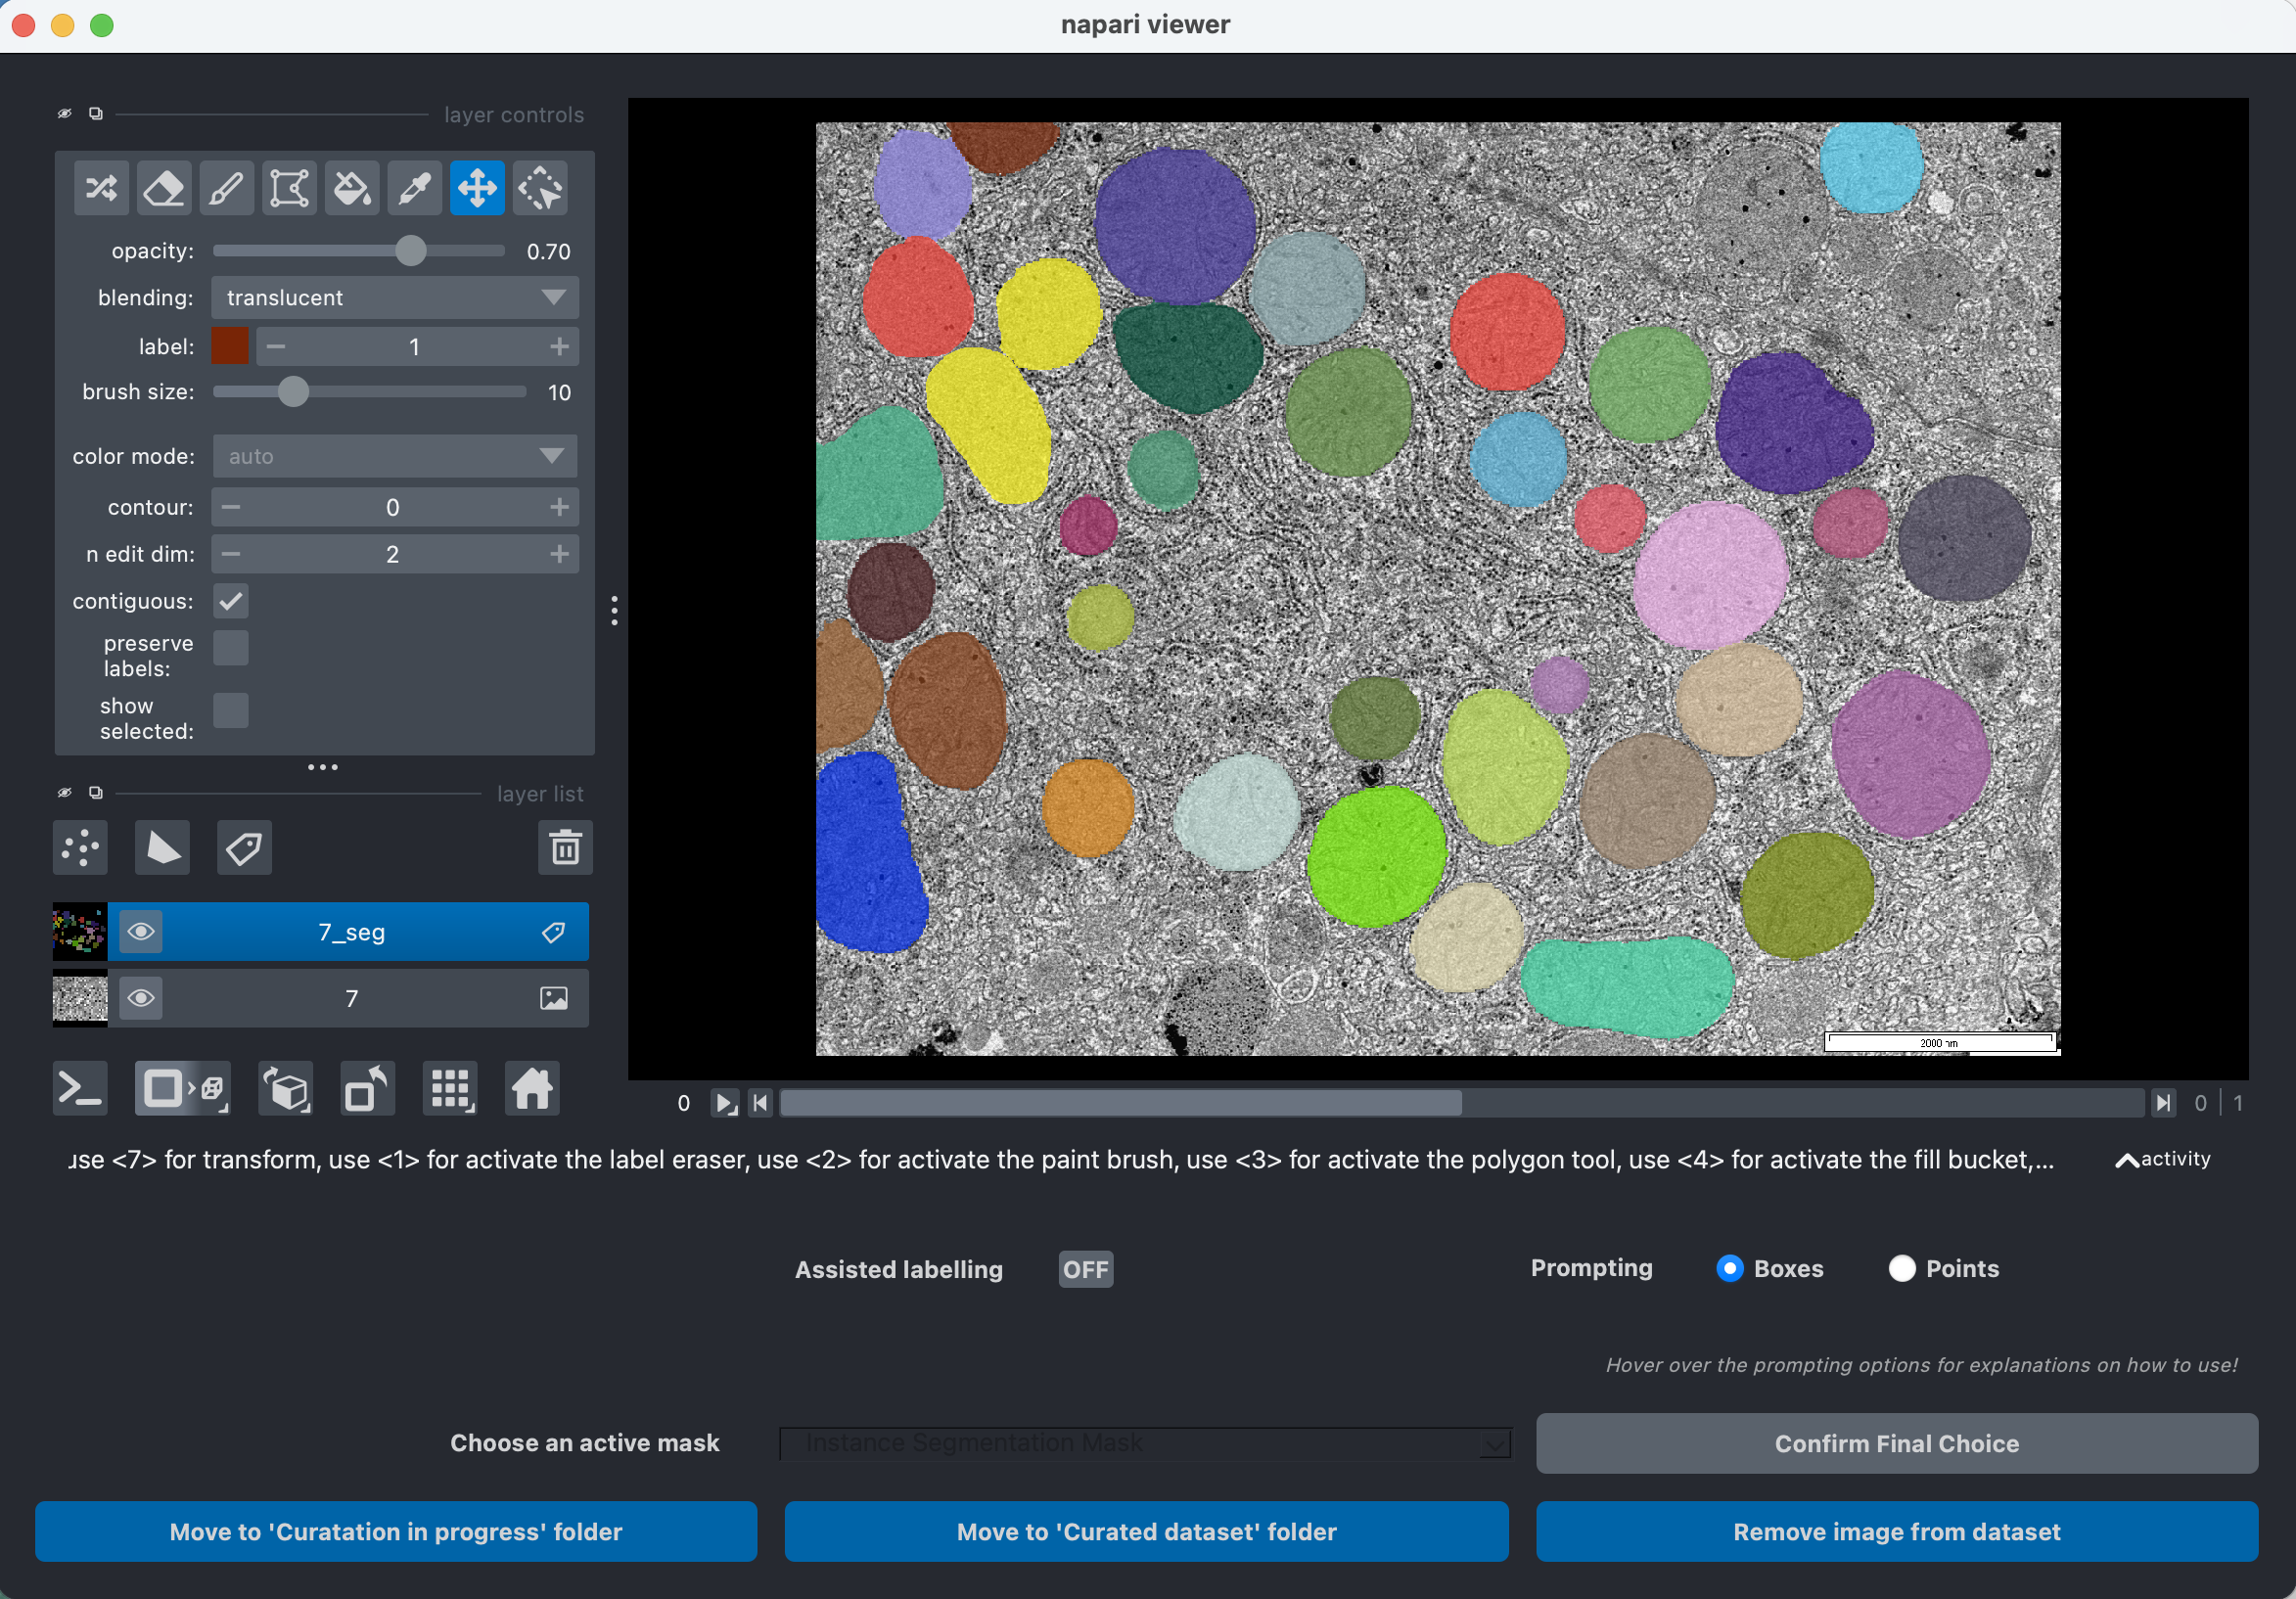
4. The viewer
In DCP, we use napari for viewing our images and masks, adding, editing or removing labels. The newest version of DCP comes with an AI-assisted labelling feature, using meta SAM2 model, to enable even faster labelling! An example of the viewer can be seen below.
In the case where you didn’t set the --multi-class argument on runtime, your mask will have a single channel. If on the other hand, you specified a multi-class task, then your mask will have two channels, the first is used for editing the objects as instances (add or remove objects, make edits), while the second is used only for setting the class label. All objects have default class label -1 (i.e. no class) and the user needs to set the labels using the bucket tool of the viewer. You can switch between instance and class mask, by toggling the axis bar (below the image).
SAM Assisted Labelling
The client includes SAM (Segment Anything Model) integration for AI-assisted segmentation. This feature helps you quickly annotate objects by drawing bounding boxes or clicking points.
Enabling SAM
Open an image in the Napari viewer
Toggle the “Assisted labelling” button to ON
The SAM model will load (first use may take a moment to download the model checkpoint)
Prompting Modes
Box Prompting (default): - Select “Boxes” in the prompting options - Draw bounding boxes around objects you want to segment - SAM will automatically generate a segmentation mask for each box - Press Enter to accept all masks, or Escape to reject the last mask - Press Ctrl+Z to undo the last box
Point Prompting: - Select “Points” in the prompting options - Click inside objects to add foreground points (white) - Press ‘b’ to toggle to background point mode (red) for refining masks - Press ‘d’ to confirm points and generate the mask - Press Enter to accept, Escape to reject
Important Notes
SAM is only available on the Instance channel (channel 0) in multi-class mode
When switching to the Labels channel, SAM is automatically disabled
SAM state is restored when switching back to the Instance channel
Hover over the prompting options in the UI for additional usage tips
Saving/removing data
After adding or removing any objects and editing existing objects wherever necessary, there are three options available:
Click the Move to Curation in progress folder if you are not 100% certain about the labels you have created. You can also click on the label in the labels layer and change the name. This will result in several label files being created in the In progress folder, which can be examined later on. Note: When changing the layer name in Napari, the user should rename it such that they add their initials or any other new info after _seg. E.g., if the labels of 1_seg.tiff have been changed in the Napari viewer, then the appropriate naming would for example be: 1_seg_CB.tiff and not 1_CB_seg.tiff.
Click the Move to Curated dataset folder if you are certain that the labels you are now viewing are final and require no more curation. These images and labels can later be used for training a machine learning model, so make sure that you select this option only if you are certain about the labels. If several labels are displayed (opened from the ‘Curation in progress’ step), make sure to click on the single label in the labels layer list you wish to be moved to the Curated data folder. The other images will then be automatically deleted from this folder.
Click the Remove image from dataset if you think that this image is an outlier and should not be included into your curated data.
Auto clean up
When you hit on of the options above to save your labels to a new directory, an automatic check will be run which makes sure that the annotations added are clean and consistent:
- If small holes are found in some objects a message appears to the user with the option to fill these
- If more than one object is found with the same instance ID, then a message appears to the user with the option to clean up and keep the largest component
- If there are still object labeled with -1 in the class mask, a message appears to the user prompting them to assign class labels
- If the number of class labels in the class mask surpasses that defined in the --num-classes argument, a message appears to the user to correct the class mask. Note: the label ids don’t need to follow a numeric order, can be 1,4,16, etc.
Data centric workflow [intended usage summary]
The intended usage of DCP would include the following:
Setting up configuration, run client (with server already running) and select data directories
Generate labels for data in Uncurated data folder
Visualise the resulting labels with the viewer and correct labels wherever necessary. If you are not completely sure of your labels you can save them in the Curation in progress directory. By adding different extensions to your label files you can have multiple masks for a single image in the Curation in progress directory. For example, for ‘img_1.tif’, label files ‘img_1_seg_Kate.tif’, ‘img_1_seg_Tim.tif’, ‘img_1_seg_Lucy.tif’ can exist. These can be evaluated all together at a later stage, when the annotators can agree on the final labels file, which is then selected and moved to the Curated data folder.
DCP Shortcuts
In the Data Overview window, clicking on an image and the hitting the Enter key, is equivalent to clicking the ‘View Image and Fix Label’ button
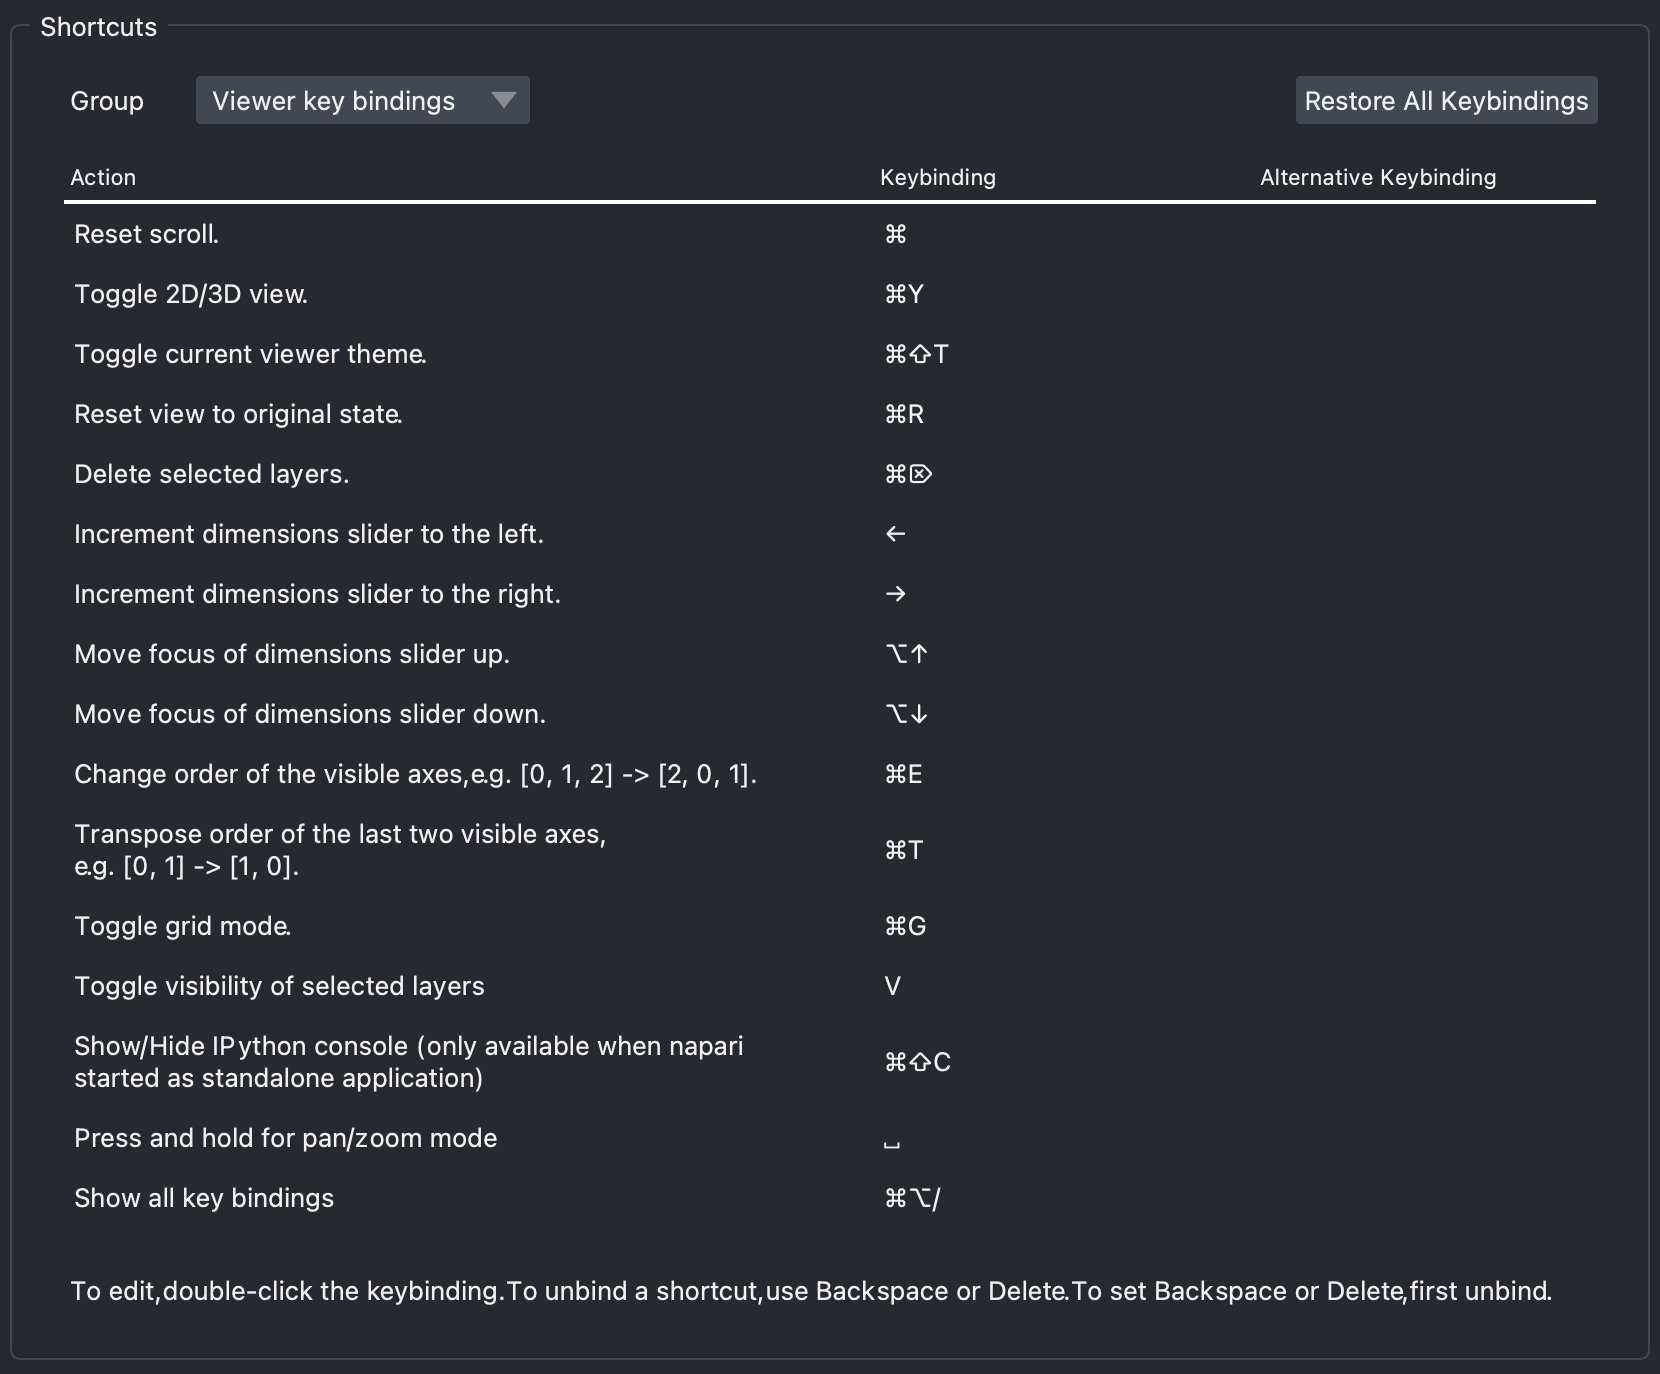
The viewer accepts all Napari Shortcuts. The current list of the shortcuts for macOS can be see below: